Friday, December 28, 2012

The Raven...

The idea for The Raven started as most of my better ideas do, late at night when I'm trying to sleep. After attending a workshop and learning the Vitri Fusaille method of glass painting from Peter McGrain (something I've wanted to do for a long time) I was ready to create a piece on my own.

After sketching out the design and planning the colors it was time to cut the colored glass and fuse it together. Full fuse at 1500° with 96 COE creates a flat "canvas" ideal for painting.

 
The black outline went down first. I scratched away some detail and design elements. It's important to obscure places where colors meet.  Then it's back into the kiln for a quick fire. It's not necessary to fully fuse and anneal the glass until all the painting is complete.


After applying an even mask of paint I used a variety of tools - sharpened sticks and brushes to remove all but the darker shadows. And back into the kiln to set this layer of paint.


Another layer, with a lighter mask, is applied and removed - leaving more detail. And, once again, back into the kiln.


And finally I returned with the black and a fine brush to add some fine detail. With all the painting complete I put it into the kiln for a full fuse, making sure the glass is properly annealed.


I'm happy with my first solo project and can't wait to start on the next one!

Wednesday, August 15, 2012

Embracing Your Inner Kindergartener

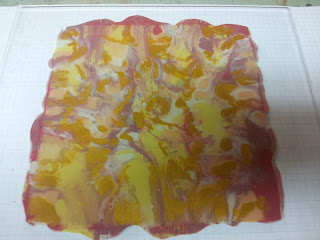
 I've experimented with this method on a smaller scale, but on a whim I decided to try it on a larger scale. After posting this picture I had a lot of questions about it.


How DID you do that? It was messy, and messy is almost always fun. So I made another one and documented the process.

After cutting a clear piece of glass the size I wanted the finished plate to be I squirted Glassline paint on it in random patterns. Keep in mind that darker colors will be more dominate so don't use a heavy hand with them.


Yes, it looks like a condiment accident. Mustard and ketchup EVERYWHERE! Once you're happy with your color combination and coverage, take a second piece of glass, place it directly on top of this one and... wait for it... press down hard making sure to mix all the colors together.


Now separate the two pieces of glass - you may need to use a putty knife, or something else with an edge, to get it started. Remember the mess I mentioned? Set the top piece aside. You can clean it off or use it too.

This is the resulting design.


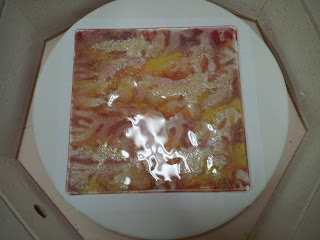
I sprinkled some sparkly mica powder liberally over the wet Glassline and allowed the whole thing to dry overnight. The next morning I placed a clear piece of glass on top and put it all in the kiln to fuse it all together.


Now we have a plate blank - but how does it get it's shape? Thanks for asking. While this was in the kiln I prepared a plate mold by painting several layers of kiln wash on the ceramic mold. Kiln wash keeps the glass from sticking to the mold.


The plate blank is placed on the mold and heated just enough for the glass to sink (slump) into the shape of the mold.

And VOILA! It's a beauiful plate!


Monday, August 13, 2012

What can you do with a texture tile?

It's fun to play with clay - it's a nice change from glass - but once you've made that awesome texture tile what do you do with it? There is a detailed blog post here if you want to create your own: Texture Tile Molds for Fused Glass Thanks Jodi McRaney Rusho and Glass With a Past! 

Since I already had some autumn leaf colored glass on hand I thought I'd start with this tile:

 I didn't have a final project in mind, I just started out making some leaves and let the inspiration take over... First was a gold square.


 Next came the bright red square.


After a fail with a green square I tried some clear glass with confetti glass spread on the tile. Then I laid it all out with a nice colorful border and clear nuggets.


Copper was the perfect color to accent my glass choices so I foiled each piece and soldered it all together. Because the texture tile pieces were pretty uneven at the edges I used a decorative soldering technique. 


Cleaned and polished and it's all ready to hang in a window. Finished size: 16.5" x 16.5"
 

Wednesday, May 16, 2012

Mining for Gold: Creating a Corporate Award

I accepted the assignment of creating an award for one of the volunteers who contributes to the website that I work on as a moderator. It was a great opportunity to show off my talents as a glass artist in a broader arena.

The concept came to me - execution was another story. I wanted the words to be in gold, ideally 22k gold. Dream big right?

Since I'm pretty skilled at hand lettering that's what I attempted first... and it looked... hand lettered.

Next thought... I have a buh-zillion years of experience in screen printing. I'll screen print it. But the clock is ticking and I don't have time to reach out to my old screen printing contacts. So, I use my ingenuity and a Michael's coupon to make my own screen

It certainly wansn't the most high tech approach but it worked well! Since I anticipate making another award in a few months I left off the name and date. That much I CAN hand letter!

With the glass all cut, all I had to do was decide what to use as my medium. I didn't have enough liquid gold, so that wasn't an option. I mulled, contemplated, meditated, and consulted other glass artists - and came up with two possible solutions.

And yes, the clock was still ticking.

I made two phone calls: One to Clay Art Center - and had a metallic gold Glassline pen on the way; The second was to Fusion Headquarters - who were sending gold mica powder and screen printing medium.

Since the mica powder was the first to arrive that's what I tried

I was fairly happy with how it printed - the hand lettering worked out great. The real test would be in the firing. Full fuse: 1475° and the lettering was washed out... not enough mica (and I didn't get a pic)

In the meantime the package from Clay Art came. So I tried out the Glassline pen - using the liquid as a screen printing medium and the pen to hand letter the name and date.

I was pleased with how it looked pre-fire. Good, clean print, nice deposit. So in it went, full fuse, 1475°

Imagine my surprise when there was nothing but the ghost of what had been there when I closed the kiln. I can't say I wasn't warned - Kim at Clay Arts said he didn't think it would work... and he was right. But thanks for being so helpful and offering the advice you did!

So, one last attempt with the mica powder. This time I added more powder to the medium - hoping that more pigment would leave a better image when fired.


Though it was a denser print it had also "spread" - not something I was happy with. But hey, that hand lettering sure looks great doesn't it?!

Time to cut my losses and do something else. Laser engraving... I made a 4th glass blank, emailed the file to Creative Awards and took it to them for engraving. And thanks to Tony Sterling (the recipient) for sending me a photo of the finished award...


I don't consider this a failure... just a learning experience. I haven't found the successful method yet.